
Happy Fourth of July! I hope everyone is enjoying their day whether they celebrate or not. This week's post will be about a beach playsuit inspired from vintage Seventeen magazine ads. In this post, I'll elaborate more on my inspiration, describe the sewing process, and review the pattern.
 |
| The top wouldn't fit properly on the dress form, so I took flat photos instead. |
INSPIRATION
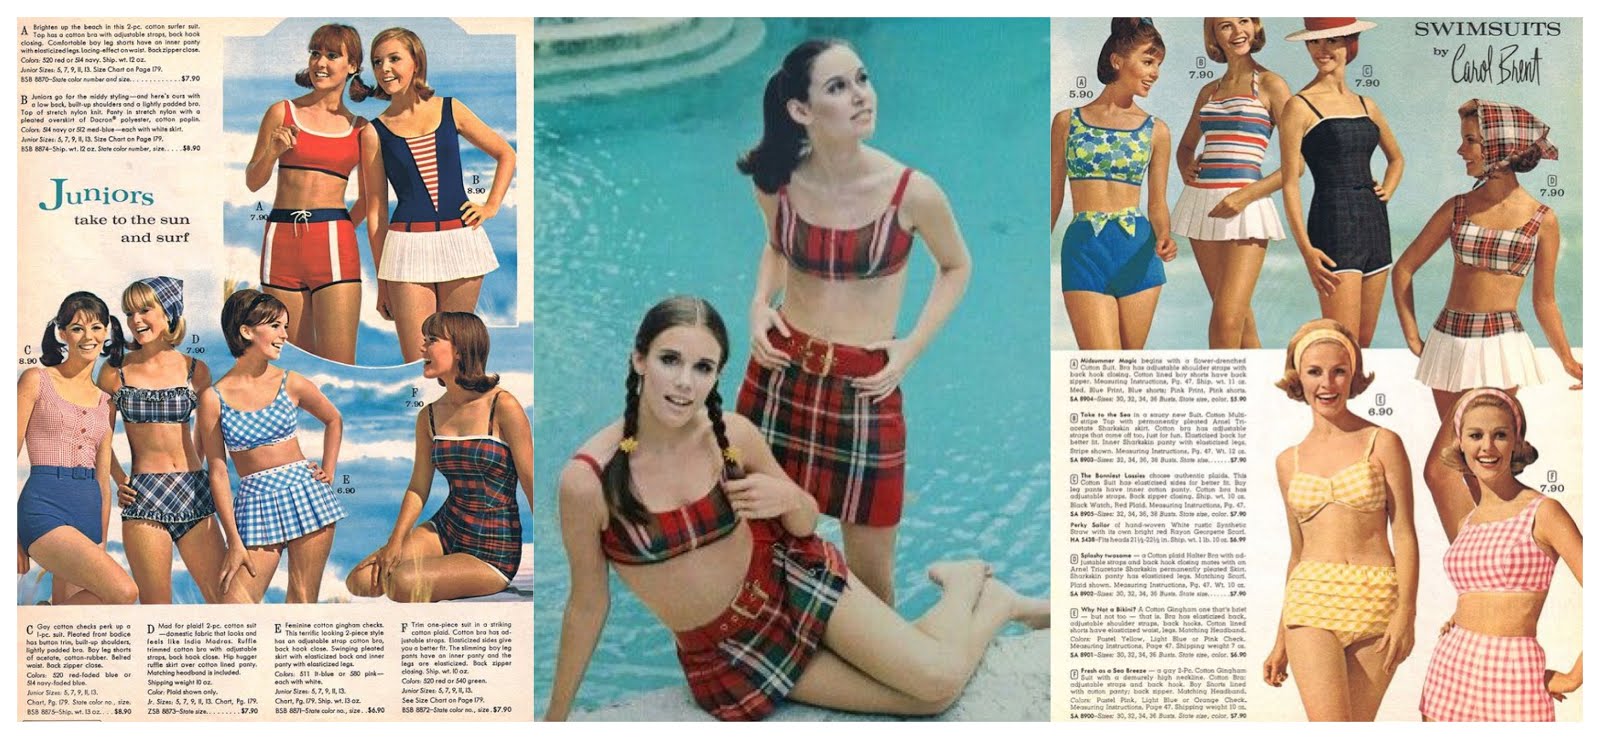
I have been in love with 1960's swimsuits for a while now. I find modern swimsuits and beach wear frustrating, because I'm picky about which areas I would like covered and which I'm comfortable with being exposed. Namely, I prefer high waisted skirt bottoms and tops that cover my chest. Although there are more shopping options available now than ever before, it seems that swimsuits remain one of the most difficult categories of clothing to hunt down precisely. On the flipside, 1960's swim advertisements often promote swimwear that is more closely attuned with my personal aesthetic than modern swim wear.
(I feel obligated to mention that I have been seeing some majorly cute swimsuits for sale lately from a few shops online! I don't want the paragraph above to sound too negative.)
(I feel obligated to mention that I have been seeing some majorly cute swimsuits for sale lately from a few shops online! I don't want the paragraph above to sound too negative.)
 |
| There were soooo many pictures I could have used, but this felt like a good sampling of the type of swimsuit I enjoy. |
When looking around on Pinterest last year, I feel deeply in love with one particular beach look. Modeled by Colleen Corby, one of my fave models from this era, this red gingham set appears in a vintage Bobbie Brooks ad in the April 1964 issue of Seventeen Magazine.
 |
| The ad wasn't spliced together like this initially, but I couldn't find the entire ad again out there. I know it's somewhere on Pinterest, however. |

At least that's my assessment of the garment based on the photograph, which is the only source I have. Someone pointed out that the piping on the skirt resembles rick-rack, so who knows. Of course, if anyone out there has any more information about the original swimsuit, I'd love to know about it! Or about the vintage Bobbie Brooks swimsuits in general. There isn't a ton of information about the brand online.
MATERIALS
After seeing these photos on Pinterest last year, I knew I had to have this swimsuit for myself. This began a long planning process I kept mostly in my head. I felt I had two paths: I could make a more "modern" swimsuit with modern materials, including spandex and swim cups, or, I could make something using more traditional materials to more closely resemble the original. Although the 1960's was a time of fiber development and advancement (at least judging by the many fiber and fabric ads seen when flipping through an old copy of Seventeen mag), many swimsuits were still made with cotton blends that lacked the tenacity of modern spandex.
I heavily considered using a spandex with a gingham print, sewing cups into a swim lining fabric, and using spandex and round elastic for the cording. My initial intention for this swimsuit was for it to be functional and well-made. Honestly, though, the thought of doing this exhausted me, and I wasn't sure if it would look true to the original. The original didn't appear to be made of a stretchy fabric, so I ultimately decided to eschew the idea of making this outfit into a true swimsuit. Of course, I am a little disappointed about not having a true swimsuit. The thought of getting the finally cotton blend in the water seems a bit odd, but maybe I'll give it a try. Instead, this look is intended to be something one would wear around the beach or as a bikini coverup.
Another challenge presented by the original set is the bias direction of the gingham. Although it's impossible to say for certain, the fabric on the original appears to be cut on the bias (if it's normal gingham). Finding a gingham that is already printed on the bias is a bit difficult, especially if you are particular about the print.
After ordering a couple different samples and looking through numerous options online and in store, I settled on a 1/8" poly-cotton red and white gingham from Fabric Direct. The fabric is lightweight, and the 1/8" pattern size was the perfect size for this project; Fabric Direct has a large variety of different gingham samples, so I'd recommend buying a sample if you're interested!
This gingham is somewhat transparent, making a lining of some sort a necessity. This was a bit of a frustrating process-I'll elaborate more on it in the Construction section below.
The white fabric for the skirt was a white bull denim from JoAnn Fabrics. The rest of the materials-piping and buttons- are also from JoAnn. I used two zippers that I had in my stash (one invisible and one regular), and the lining fabric I ended up using is also from my stash.
In the future, I would probably order some fabric from Spoonflower with the gingham print on the bias but aligned with the straight grain. It would mitigate some of the obvious problems caused by cutting some pieces of fabric on the bias but not others. If I printed the fabric this way on a thicker fabric, I also could have finished the top with facings rather than a lining. Anyways, on to the pattern!
After seeing these photos on Pinterest last year, I knew I had to have this swimsuit for myself. This began a long planning process I kept mostly in my head. I felt I had two paths: I could make a more "modern" swimsuit with modern materials, including spandex and swim cups, or, I could make something using more traditional materials to more closely resemble the original. Although the 1960's was a time of fiber development and advancement (at least judging by the many fiber and fabric ads seen when flipping through an old copy of Seventeen mag), many swimsuits were still made with cotton blends that lacked the tenacity of modern spandex.
I heavily considered using a spandex with a gingham print, sewing cups into a swim lining fabric, and using spandex and round elastic for the cording. My initial intention for this swimsuit was for it to be functional and well-made. Honestly, though, the thought of doing this exhausted me, and I wasn't sure if it would look true to the original. The original didn't appear to be made of a stretchy fabric, so I ultimately decided to eschew the idea of making this outfit into a true swimsuit. Of course, I am a little disappointed about not having a true swimsuit. The thought of getting the finally cotton blend in the water seems a bit odd, but maybe I'll give it a try. Instead, this look is intended to be something one would wear around the beach or as a bikini coverup.
Another challenge presented by the original set is the bias direction of the gingham. Although it's impossible to say for certain, the fabric on the original appears to be cut on the bias (if it's normal gingham). Finding a gingham that is already printed on the bias is a bit difficult, especially if you are particular about the print.
 |
| Available here, but you'll need to buy at least three yards. |
After ordering a couple different samples and looking through numerous options online and in store, I settled on a 1/8" poly-cotton red and white gingham from Fabric Direct. The fabric is lightweight, and the 1/8" pattern size was the perfect size for this project; Fabric Direct has a large variety of different gingham samples, so I'd recommend buying a sample if you're interested!
This gingham is somewhat transparent, making a lining of some sort a necessity. This was a bit of a frustrating process-I'll elaborate more on it in the Construction section below.
The white fabric for the skirt was a white bull denim from JoAnn Fabrics. The rest of the materials-piping and buttons- are also from JoAnn. I used two zippers that I had in my stash (one invisible and one regular), and the lining fabric I ended up using is also from my stash.
In the future, I would probably order some fabric from Spoonflower with the gingham print on the bias but aligned with the straight grain. It would mitigate some of the obvious problems caused by cutting some pieces of fabric on the bias but not others. If I printed the fabric this way on a thicker fabric, I also could have finished the top with facings rather than a lining. Anyways, on to the pattern!
THE PATTERN
Vogue 5489 is a 1960's "playsuit and skirt" pattern. It features a top, skirt, and brief panty shorts. The top comes in three lengths- cropped, cropped with a lower band, and full length with fisheye darts. The skirt also comes in two lengths with an optional waistband, one short and one long. Based on the styling on the front cover, it appears this pattern was at least partially intended for beach or resort wear.

I was really fortunate and lucky to find this pattern, as it didn't need much adjustment.
The most noticeable alteration I made to the top was to change the waist darts to a shoulder princess line. This was relatively simple and worked out alright; fortunately, the pattern top matched the original shape pretty well. The original skirt for the pattern is A-line with a slightly flared circle skirt shape. It has a pleat on the side seams and a seam down the center front. I removed the side seam and added a couple pleats to the front. Overall, this wasn't too difficult of a process.
I was lucky to find this pattern! However, I did encounter a few fit issues that I'll discuss below (not the pattern's fault).
CONSTRUCTION AND FIT
Vogue 5489 is a 1960's "playsuit and skirt" pattern. It features a top, skirt, and brief panty shorts. The top comes in three lengths- cropped, cropped with a lower band, and full length with fisheye darts. The skirt also comes in two lengths with an optional waistband, one short and one long. Based on the styling on the front cover, it appears this pattern was at least partially intended for beach or resort wear.
I was really fortunate and lucky to find this pattern, as it didn't need much adjustment.
The most noticeable alteration I made to the top was to change the waist darts to a shoulder princess line. This was relatively simple and worked out alright; fortunately, the pattern top matched the original shape pretty well. The original skirt for the pattern is A-line with a slightly flared circle skirt shape. It has a pleat on the side seams and a seam down the center front. I removed the side seam and added a couple pleats to the front. Overall, this wasn't too difficult of a process.
I was lucky to find this pattern! However, I did encounter a few fit issues that I'll discuss below (not the pattern's fault).
CONSTRUCTION AND FIT
 |
| Here's a closeup of the top mockup! |
As I mentioned above, the fabric was somewhat transparent, so a lining of some sort was necessary. The pattern instructions provide steps for sewing a lining with mostly on the sewing machine (only one hand sewing step), but the piping prevented me from doing this. I wanted to have the armhole piping sewn in a continuous loop rather than joined when the side seams were sewn. So, most of the different techniques for sewing a lining in with a machine wouldn't work (I tested them on the mockup!). Instead of a traditional lining, I decided to interline the fabric pieces and simply baste the white cotton fabric to the back of the main fabric pieces. This worked relatively well, but the inside doesn't look as clean as it could be. If I were to repeat this project, I would definitely use a less transparent fabric and use facings instead. It would look a lot more professional this way.
I did make a full mockup of the top though! I added some extra length to the bodice afterwards. I also took it in ever-so-slightly at the waist to fit better, but I should have taken in a little more.
I didn't make a mockup for the skirt, which ended up working out just fine! But I did end up taking the waist in a little bit, and I decided to make this alteration in the center back seam to keep the front piping detail aligned with the top princess line. In the future, I would alter the pattern differently, but I spent way too long thinking about this project, so I was happy to have it done.
One of my biggest regrets on this project was the waistband. Because I cut it on the bias, it sags a bit. Also, I chose not to baste white cotton to the back (like I did on the top), because I knew it would be faced. I think this led to it looking flimsy. Also, a weird note- the waistband facing provided for in the pattern is a rectangle, whereas the actual waistband is shaped. I tried to use the rectangle piece, but it didn't work, so I cut more of the original waistband pieces and it worked out just fine. I like the look of the facing on the inside, but I do wish the front of the waistband was firmer.
OVERALL THOUGHTS
I'm not sure if I'm pleased with final result. I think I could have done much better, and I could probably improve upon the result if I made this project again. The sewing process took way longer than it should have to complete, because I wasn't enjoying the process and I found it stressful. I spent almost a month on this project, which is more time than I would usually would devote to something like this. Nevertheless, I'm glad it's done! It had been on my list for a long time.
Also, on an unrelated note! I tried really hard to try and recreate the exact pose that Colleen Corby is making in the advertisement, but I looked really, really silly in each one. I might try again at the beach at some point to really do it properly.
CONCLUSION
Despite my misgivings about this project, I don't think it looks horrible. I just wished it looked a little better! I still really want to make a true swimsuit in the future. I've got several ideas for some, but I'm not sure if I'll have to finish it any time soon (I've got some other projects in line first!)
 |
| I accidentally blinked in the left picture, oops! But I still liked the photo. |
Thank you so much for reading this far! Let me know if you have any comments or questions down below.
To see more of my Vogue patterns projects, click here.
To see more of my projects using gingham, click here.
I adore this look, and the concept of recreating it from a vintage ad! I'm amazed you stuck through a month of working with it. It's too cute! I feel like I've suddenly learned a lot about the history of swimwear in the 60's, haha.
ReplyDeleteHoi
Thank your for reading and for your nice comments!! Apologies it took me so long to reply though.
Delete