
Welcome welcome! In today's post, I'd like to introduce you all to a project I completed earlier this year. Although I meant to post about this in February for Valentine's Day, I never got around to writing the post! So, in this post I'll be discussing my process and the pattern I used for this corset top look. Keep reading down below for more details!

Corset tops have been very trendy for the last couple years, so I was happy to finally make one! There are a lot of cute options out there (as well as patterns to make your own), so I spent some time looking at both existing corset tops and patterns to figure out what I wanted to make.
THE INSPIRATION
Most of my inspiration for making this top came directly from these Lazy Oaf tops, all released at slightly different times. I had considered making them in the past, but I knew finding heart shaped buckles would be quite an endeavor.
 |
| Most of these were all designed by Lazy Oaf, but the upper right corner was created by GEM (Lazy Oaf's sister brand created by the founder Gemma), and the upper right corner is from Dolls Kill. |
THE MATERIALS
My fabric choices were kind of basic. I chose a basic black natural fiber fabric (cotton I think) for both the outside and lining of the top. For the bottom edge, I used a pre-made black double fold bias tape.
While my fabric choices were very simple, I had some fun searching for heart details! The two heart buckles are from Aliexpress (link here). Although I don't love purchasing items from Aliexpress, the price is great, and I don't believe these buckles can be purchased anywhere else.
I purchased the largest size (39 mm) in silver for this project.
 |
| Available here. |
The heart patch is from Patches by Lauren on Etsy. I customized it to say "introvert," as I am truly, deeply introverted. Highly recommend this shop for any custom patch you may need!

Based on some recommendations I heard online, I tried inserting zip ties in place of boning. Because this is a casual top, I was fine with testing out a "boning" with lower rigidity. The result was less than ideal, but the zip ties I purchase do provide a little bit of structure compared to having nothing at all. However, if you plan to make a more serious corset, I don't recommend using zip ties (at least not the flimsy ones I bought); instead, order some real steel boning.

Also, because this top laces up the back, eyelets were a necessity. I didn't think this would be a challenge, as I've used eyelets many times before, but it was my first time using them in Japan. I ended up having a bit of trouble hammering them in. The process was more or less the same, but the halves on a couple eyelets fall out quite easily, and I didn't realize this until I had already started on the top itself. I'm not sure who the real culprit is-the fabric thickness, the eyelets themselves, or my hammering skills. Either way, I'll be choosing different eyelets next time.
 |
| (The silver eyelets for the straps were okay, but the back eyelets used to lace up were difficult.) |
THE PATTERN
To create this top, I used the Corset Top Sewing Pattern by Miz Patterns as a base. It's super on trend, given how popular that corsets have become for everyday wear recently. The pattern has a rounded neckline, a curved lower hemline (finished with bias tape), and optional topstitching/seam lines to insert boning as you see fit.
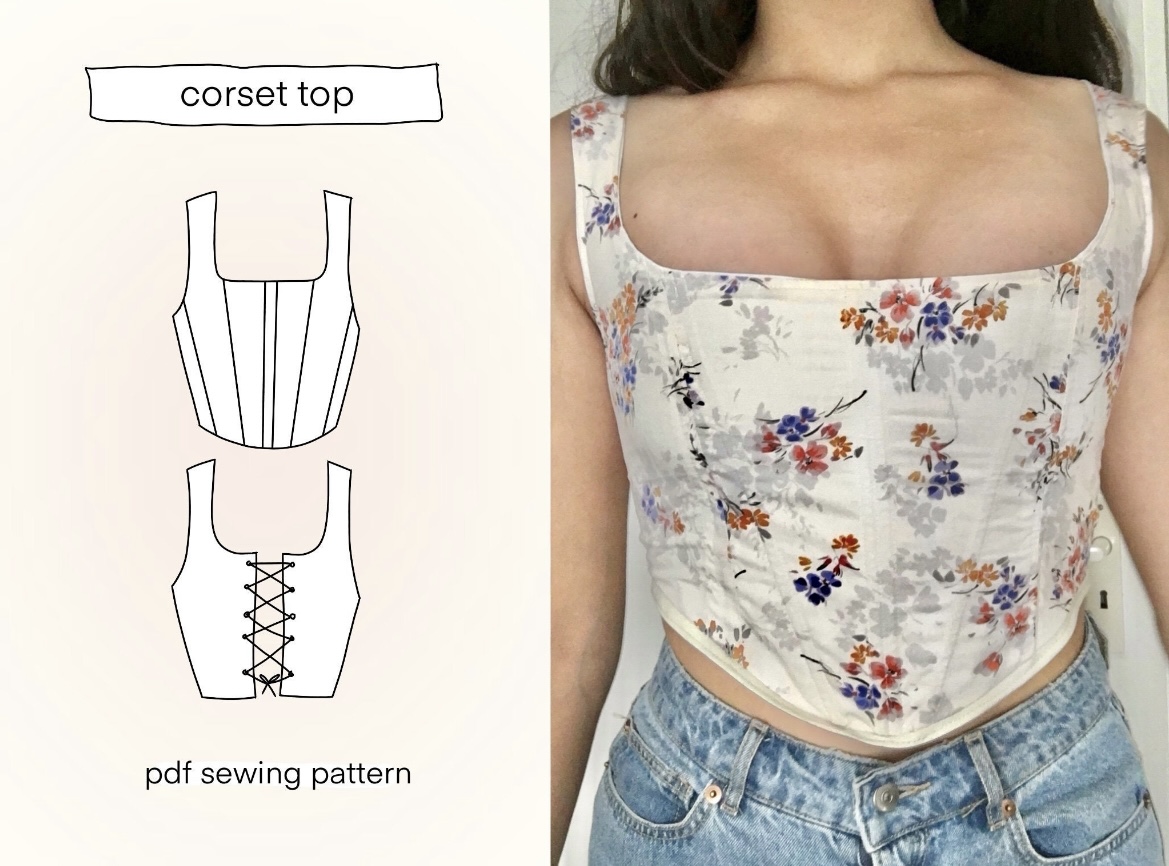 |
| Available here. |
I was initially hesitant to recommend this pattern, though, because it lacks some of the markings and detailed instructions included in more professional patterns. For example, there were no grain lines provided to cut the pieces, and the instruction pictures are not quite as clear as they could be (I believe they are simply stills from the accompanying Youtube video). However, despite having said this, the pattern sews up quite nicely- all the seams match up as they should, and it's a great, inexpensive, base pattern if you'd like to modify the pattern for a different style! So, if you have experience with sewing patterns, I'd highly recommend it.
Also, given that the price is so low, I can't really complain at all. The pattern is worth the money you pay for it. I also sense that the pattern creator keeps kind of a low profile online (and is young), so I don't want to knock someone making extra money selling patterns online. It's a difficult process! (And, since I made this pattern back in January, I've noticed that the images on Etsy have been updated a bit-so perhaps the pattern has been improved as well!)
I altered the straps of the pattern to account for the straps and buckles that I wanted. Initially, the straps were curved to conform to the body; I ended up straightening them when I created the strap. I was worried this might make the fit unflattering, but I was pleasantly surprised that it worked out on the first try! Also, it's worth mentioning that I made a size XL, the largest size available for this pattern. It fit me just about perfectly (though if you want a tighter fit you could size down and tighten the lace more on the back), but if you are much bigger than I am (a US 10/12), this pattern may not fit without modification.


OUTFIT DETAILS


CONCLUSION
Well that's all for this one! Overall, it was not too hard of a project, and I'm happy with how it turned out. It wasn't too difficult or lengthy to sew, and I've got something fun to wear out of it. As always, let me know if you have any questions down below!

To see more of my heart-themed projects, click here.
To see more of my projects made from indie sewing patterns, click here.
No comments
Post a Comment