
Hi everyone! Today's post is about a sailor sock tutorial. First and foremost, I would like to say these socks were not my idea, and they're based on socks that I found online. I've attached a pattern for these socks below with the tutorial. This post is a bit longer than usual, but I hope you guys find it useful!

I first saw some similar socks online on the Taobao reseller Syndrome Store, but they were sold out (and I didn't want to deal with purchasing one pair of socks from Taobao). I later found the original socks by Erimaki for sale on Rakuten, but couldn't check out for some reason. Finally, I found some available from MahoBeauty.com and purchased them here.

The socks I purchased were absolutely wonderful, but way too small for my feet. I'm a US Size 11 and I could not fit them on to my foot. My mom, who wears a US Size 8.5, also couldn't get them on. The socks were only available in one size, which I should've paid more attention to when purchasing. According to Maho Beauty, they fit a 21 to 23 cm long foot. For my almost 27 cm feet, this was not gonna cut it. The hole opening on the sock was also too tiny. But, as an avid lover of sailor collars, I really did not want to give up!
So, sizing was my primary motivation in making the socks myself. Otherwise, I would've just worn them as is. That being said, if you have tiny feet, I absolutely recommend purchasing from one of the shops above! Maho Beauty was great to deal with, and the shipping from Lithuania was also relatively quick (about a week and a half to get to me).

Also- the Japanese originals depicted above are of better quality than this tutorial will provide. I based the pattern and construction on the pair I bought from Maho Beauty; there is a small exposed seam on the back and the socks are sewn from one pattern piece. The Japanese Erimaki socks, however, are sewn from multiple pieces and feature a sailor collar sewn more like that of a garment. As a result, these socks are a bit nicer and better quality. If exposed seams and a lack of seam finishes really bother you, this tutorial might not be for you. All things considered, this project can be finished fairly quickly and without too much fuss, all with a regular sewing machine.
Sorry for this extremely long winded explanation; let's get into the actual tutorial!
MATERIALS

- Sailor Sock Pattern, available by clicking here
- ~1/2 yard of Stable Knit fabric (like ponte)
- 1.5 yard of 1/4" White Trim (twill tape), for two socks
- Thread to match your knit
- White Thread to match the trim
- A jersey/ball point sewing machine needle
- A walking or nonstick foot (optional)
THE PROCESS
Step 1: Checking the pattern.
Once again, the pattern is available here. To make sure you're printing the pattern correctly, the test square should measure 1" on each side.
Once again, the pattern is available here. To make sure you're printing the pattern correctly, the test square should measure 1" on each side.
The first thing you'll need to do for this tutorial is to compare your foot size to the pattern size. I've featured a lengthen/shorten line on the pattern to adjust the length. The easiest way to compare your foot to the pattern size is to simply place your foot on the pattern and see how it compares to the fold line, meaning the line that you place on the fold to cut. If your foot is much longer or shorter than the pattern, adjust using the lenghten/shorten line. If you're unfamiliar with how to do this, there's a great tutorial on it here.
As is, the pattern will fit a 7.75" foot. For my size 11 feet, I added in two inches. I would've uploaded a larger size to the page, but I wanted it to fit easily on a standard 8.5x11 inch page.
As is, the pattern will fit a 7.75" foot. For my size 11 feet, I added in two inches. I would've uploaded a larger size to the page, but I wanted it to fit easily on a standard 8.5x11 inch page.
Please keep in mind that your knit fabric will stretch some, so the pattern length can be a little shorter than the length of your foot.
Note: I'm not a professional pattern maker by any means, so there's no guarantee this pattern will work for you. I've added it here to help others out, but I highly recommend making a mock up out of your intended fabric.
Step 2: Cutting out the fabric.
This step is exactly as it sounds. Once you've checked your pattern, you're ready to cut your sock and gusset out.
Once you've cut out your pattern, the pieces should look like this.

 |
| You can pin the pattern, pattern weights, or trace the pattern and then cut it out. The pattern in this picture is before I "digitized" it, so its a full pattern rather than half a symmetrical pattern. The two inch extension is also visible. |
Once you've cut out your pattern, the pieces should look like this.
Step 3: Sew the back seam.
The sewing actually begins in this step! You might want to use a nonstick foot on your sewing machine if you have one. If not, it'll still be super easy and quick. I used a regular straight stitch, but you could zig zag or serge the seams if you wanted to. I stuck with a regular stitch simply because the pair I bought were sewn that way. Also, remember to use a jersey needle!
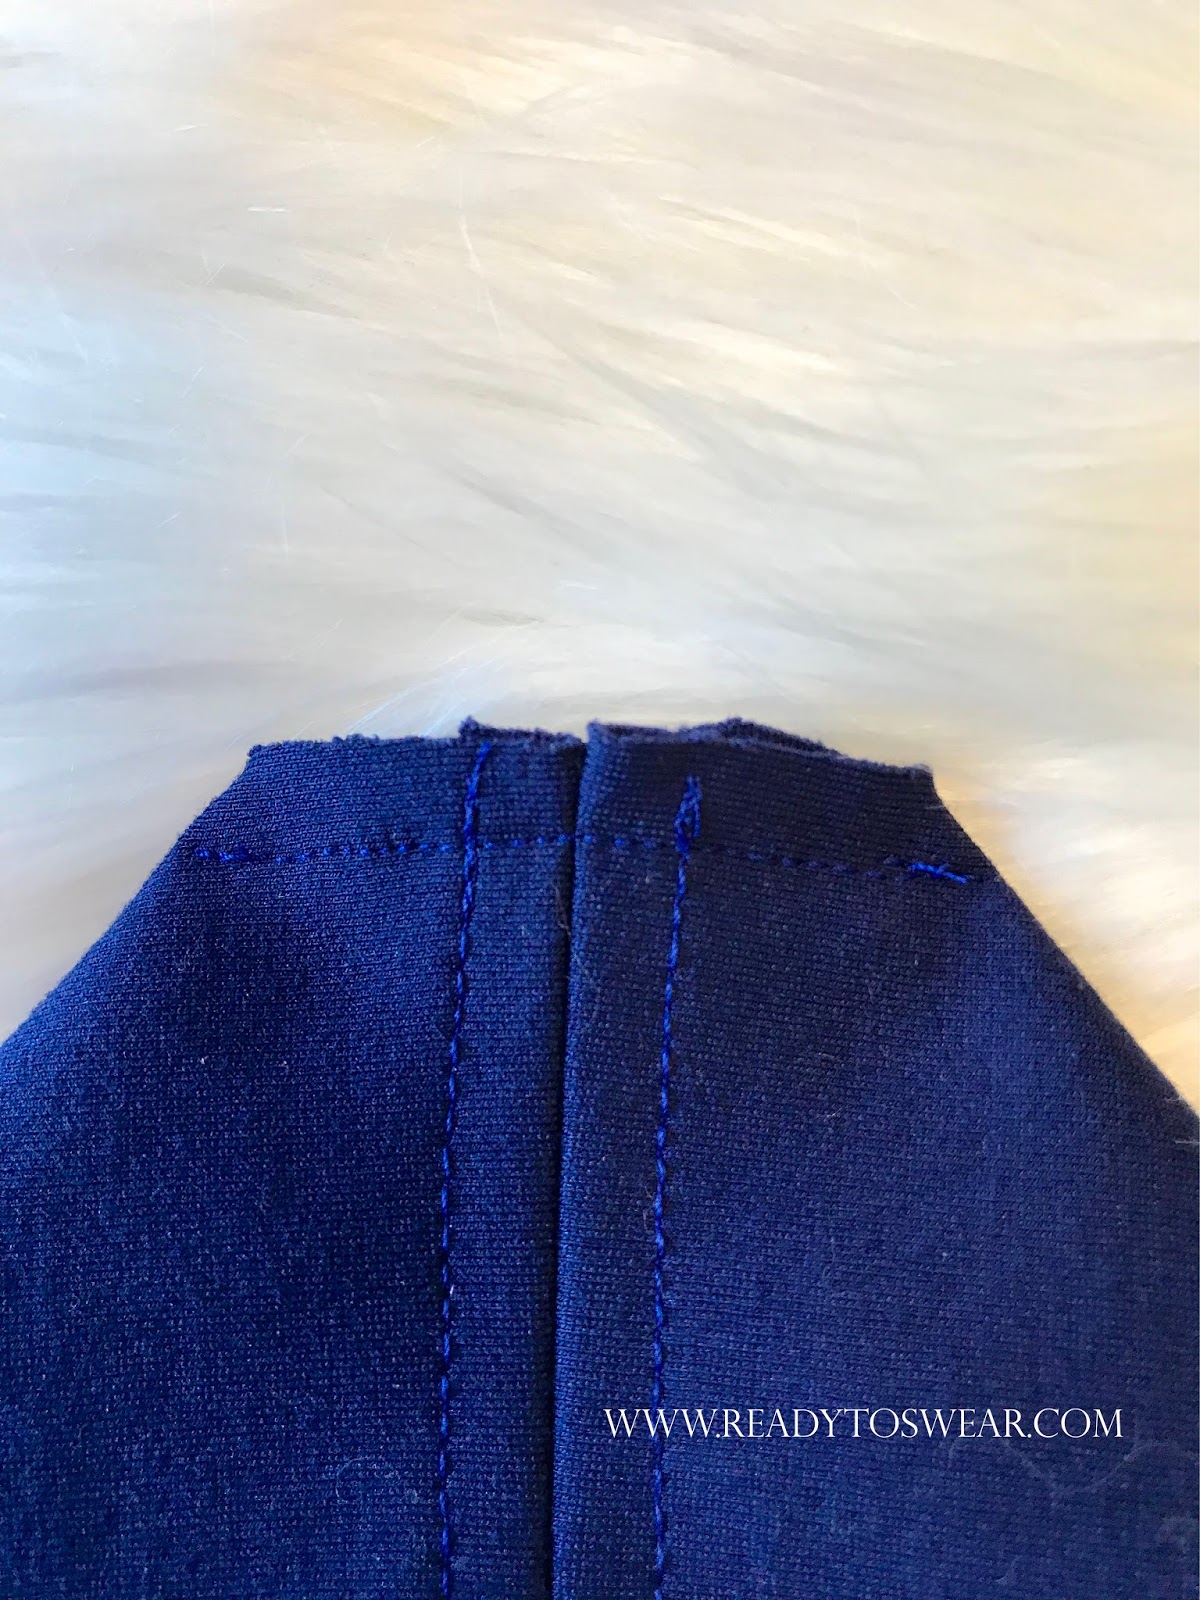
The first seam you'll sew is the back heel seam of the sockpiece, as shown below. This seam has a 3/8" seam allowance.

After you sew the seam, press it open and then topstitch the seam a quarter inch away on each side, as shown below.

Step 4: Press the Edges Around the Collar Down
This step might seem a little counterintuitive at first. First, you'll need to clip each side of the sock where indicated on the pattern. Only clip 1/4" into the fabric.

Next you'll press down 1/4" around the sock, from clip to clip. Hopefully the photo below demonstrates this clearly.


Here's a close up of the corner of this step. You'll want to fold in the corner and then tack it down with a few stitches.

Step 5: Adding the trim!
Now we're on to adding the trim! This step is probably the one that takes the most time, but will have the biggest impact.
The first part of this step will require you to take your twill tape and pin it around the area you just pressed, hiding the raw edge.

Here's a close up of the corners; try to fold them neatly. I tried to take photos of how to do this neatly, but they didn't really turn out.
Now, sew down the trim around the outermost edge. This will tack down pressed edge and keep it in place.
Note: You might have a little trouble topstitching around the corners, especially if you're just using a normal sewing machine foot. You can solve this problem by putting a layer of tissue paper underneath

After that, you're going to sew down the other side of the trim, stitching close to the edge once again.

The first half of the trim is now complete! Now time for the second round. I found it helpful to mark the line for the second piece of trim before sewing it. The pieces of trim are positioned a quarter inch away from each other, so I used a marking pencil to mark the line for the second trim piece to go.

Now you'll pin the trim to the sock like you did the first time around. The only difference is that you'll curve the edges this time at the ends, as shown below.

You'll sew this second layer of trim exactly like the last, starting with the outer layer and then following with the inner layer. This should be easier to sew, because the second piece isn't as close to the edge of the fabric.

Once you've got this done, it's smooth sailing for the rest of this project!
Step 6: Sewing the bottom heel seam
The next step is to sew the heel seam with a 1/4" seam. You'll sew this with the open seam allowances inside the sandwich that you'll sew.

After this step, the dimensionality of the back of the sock is much more visible.


Step 7: Sew the Center Front Seam of the Sock
To sew the seam of the sock that runs down the middle of your foot, you'll pin the seam with the white trim on the outside. This might feel wrong, because normally the "right" side goes face to face, but in this case, the collar will turn correctly when you pin as shown.This seam is also a 1/4" seam allowance.


After sewing the seam, this is what the sock will look like if you turn it inside out. The majority of the sock is done! You can try on the sock at this point if you'd like.


Step 8: Sew the Toe of the Sock
Now it's time to sew the toe of the sock! Once again, this seam is sewn with a 1/4" seam allowance.


Now the sock is almost entirely done, save for the gusset. This is how your sock should look thus far.


Step 9: Attach the Gusset to the front of the Sock
It's the final step of the sock! Here we're going to attach the gusset. The gusset helps reinforce the front seam of the sock and adds a cute detail to the front.
First you'll need to press your gusset in half along the foldline.
Note: If your gusset doesn't perfectly match the shape in the pattern, that's completely fine. The shape of the gusset won't have much of an impact on the final result.


Now we're going to pin the gusset to the sock and tack it down in three spots, depicted below. If the placement is in different locations that's okay-the main focus is on attaching the gusset for reinforcement.

Once you've sewn that, then you're completely done! Repeat these steps to make a second sock.
Here's some more images of the final result!

I wore the socks all day the day I took these photos, and they were super comfortable!


Thanks so much for stopping by and reading this far! I'm looking forward to wearing these socks around with different shoes and making some in different colors. I'm also interested in developing different versions of a pattern.
If you use this pattern to make any sailor socks, I'd love to see them!! Comment here or contact me on Instagram @akatemason.
Now we're on to adding the trim! This step is probably the one that takes the most time, but will have the biggest impact.
The first part of this step will require you to take your twill tape and pin it around the area you just pressed, hiding the raw edge.
Here's a close up of the corners; try to fold them neatly. I tried to take photos of how to do this neatly, but they didn't really turn out.
 |
| Sorry for the blurry photo! |
Now, sew down the trim around the outermost edge. This will tack down pressed edge and keep it in place.
Note: You might have a little trouble topstitching around the corners, especially if you're just using a normal sewing machine foot. You can solve this problem by putting a layer of tissue paper underneath
After that, you're going to sew down the other side of the trim, stitching close to the edge once again.
The first half of the trim is now complete! Now time for the second round. I found it helpful to mark the line for the second piece of trim before sewing it. The pieces of trim are positioned a quarter inch away from each other, so I used a marking pencil to mark the line for the second trim piece to go.
Now you'll pin the trim to the sock like you did the first time around. The only difference is that you'll curve the edges this time at the ends, as shown below.
 |
| Yes, I overpinned this. |
Once you've got this done, it's smooth sailing for the rest of this project!
Step 6: Sewing the bottom heel seam
The next step is to sew the heel seam with a 1/4" seam. You'll sew this with the open seam allowances inside the sandwich that you'll sew.
After this step, the dimensionality of the back of the sock is much more visible.
Step 7: Sew the Center Front Seam of the Sock
To sew the seam of the sock that runs down the middle of your foot, you'll pin the seam with the white trim on the outside. This might feel wrong, because normally the "right" side goes face to face, but in this case, the collar will turn correctly when you pin as shown.This seam is also a 1/4" seam allowance.
 |
| This is just to show how the seam looks once it's sewn. |
After sewing the seam, this is what the sock will look like if you turn it inside out. The majority of the sock is done! You can try on the sock at this point if you'd like.
Step 8: Sew the Toe of the Sock
Now it's time to sew the toe of the sock! Once again, this seam is sewn with a 1/4" seam allowance.
Now the sock is almost entirely done, save for the gusset. This is how your sock should look thus far.
Step 9: Attach the Gusset to the front of the Sock
It's the final step of the sock! Here we're going to attach the gusset. The gusset helps reinforce the front seam of the sock and adds a cute detail to the front.
First you'll need to press your gusset in half along the foldline.
Note: If your gusset doesn't perfectly match the shape in the pattern, that's completely fine. The shape of the gusset won't have much of an impact on the final result.
Now we're going to pin the gusset to the sock and tack it down in three spots, depicted below. If the placement is in different locations that's okay-the main focus is on attaching the gusset for reinforcement.
 |
| Side note: I realize the white stitches visible above look kind of bad. I tried to avoid this by using a navy bobbin thread with my white thread while topstitching the trim in Step 5, but it still looks kind of messy. I also tried to increase the tension on my sewing machine, which helped a little bit. If this bothers you, you could try adding a ribbon or bow around the collar to hide it. |
Once you've sewn that, then you're completely done! Repeat these steps to make a second sock.
Here's some more images of the final result!
I wore the socks all day the day I took these photos, and they were super comfortable!
Thanks so much for stopping by and reading this far! I'm looking forward to wearing these socks around with different shoes and making some in different colors. I'm also interested in developing different versions of a pattern.
If you use this pattern to make any sailor socks, I'd love to see them!! Comment here or contact me on Instagram @akatemason.
No comments
Post a Comment